How to Restore an XP Mode VHD into Newly Installed Win 7
Windows XP mode is a feature of the Windows 7 operating system that allows the user to run applications which are only compatible with Windows XP. It seems that Microsoft is taking away reasons from users for not upgrading to Win7 by assuring that significant applications run with Win7 Operating system through Windows Virtual environment. Users can run Windows PC compatible applications on Windows 7 by developing a Virtual machine so that when a user upgrades from Windows XP then he/she will convert VHD in Windows 7, he/she still have legacy software kept working.
This can be made possible with the help of "Windows XP Mode" that is built in feature in Win7 that gives users a platform to run Win XP supportive applications on Win7 smoothly. Basically, it enables running older business applications to restore XP mode VHD into Win 7 desktop.

Windows XP Mode (XPM): The Advantages!
The XPM feature is exclusively available with Win 7 editions: Enterprise, Professional and Ultimate. It helps to create XP Virtual environment that can be utilized to run Win XP compatible applications on Win 7. This can be made possible by installing the software on Virtual Win XP machine and then successfully integrating them with startup menu. In this way, a user gets the facility to work with desired applications without opening the VM Window.
Note: To work with "Windows XP Mode", it is mandatory to have virtualization software like Windows Virtual PC.
- Windows XP mode is often the most economical option for many companies that have invested heavily in Windows XP based line of business application.
- Windows XP mode provides solutions of compatibility problems. Most of the IT folks seem to have software and hardware compatibility problems with Windows Vista. Windows XP mode allows the user to run Windows XP applications without worrying about application compatibility.
- XP mode provides upgrade to virtual PC. We know that Virtual PC has been used around for a long time by many users and it has improved from one version to next. Among the improvements in the new versions is the ability to access the computer’s physical hard drives through a virtual machine.
- Windows XP mode offers USB support option. It has previously been impossible to access USB devices from within a virtual machine but because of XP mode feature the user can easily access USB devices.
- The benefit of using the XPM services is one can access and start up the applications through the taskbar or the Start Menu.
- Data Sharing using cut, copy and paste options between the host and Virtual drives is possible.
- Drive sharing, printer sharing, folder integration are some advantages of Windows XP Mode.
- Scan – First of all, it entirely scanned my corrupted .vhd file.
- Preview – After completing the scanning task, It displayed the preview of repaired items in an explorer view on the left panel.
Note: On the top of right panel there is search bar which helps the user to search file by its specific name.
- Save – At the end, the software created a new .vhd file & saved the repaired data in a desired location.
Virtual XP Mode Could not Enable Integration Features Problem
The entire concept discussed above illustrates why move Windows XP mode base .vhd into Windows 7 is beneficial. Since flaws in an application are obvious, I could not remain unaffected with trouble.
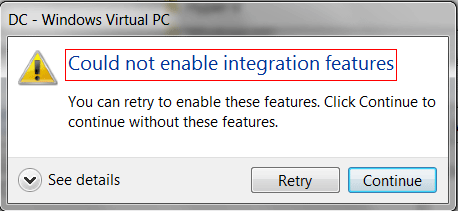
I upgraded my system to Windows 7 Professional from Windows XP. I used XPM for my software applications keep working on the new platform and very honestly, I was satisfied with the services. The Windows Virtual XP had the option of System Restore, I made use of it but the process ended with an error saying "Could Not Enable Integration Features".

I was given with the choice to click on "Retry or Continue". I clicked on the 'Continue' option and unfortunately again an error message popped up on screen:
Windows could not start because the following file missing or corrupt: \windows\system32\config\system.

If Your VHD File is Inaccessible Try This Solution to Recover VHD File
Without losing hope, I took help from my all time problem solver – "Google" that took me to the support section of renowned data recovery software. A supportive team of experts, I must say They listened to my problem calmly, analyzed the issue and recommended me with Hyper-V recovery software that helps to restore data from damaged VHD files in three retrival steps.
Conclusion
I evaluated the tool if it could help me to get back data from corrupt or missing system through the demo version of the solution and it actually lived up on my expectations. The trial version showed me the preview of my VHD file content and I saved the results after purchasing personal license of the tool.